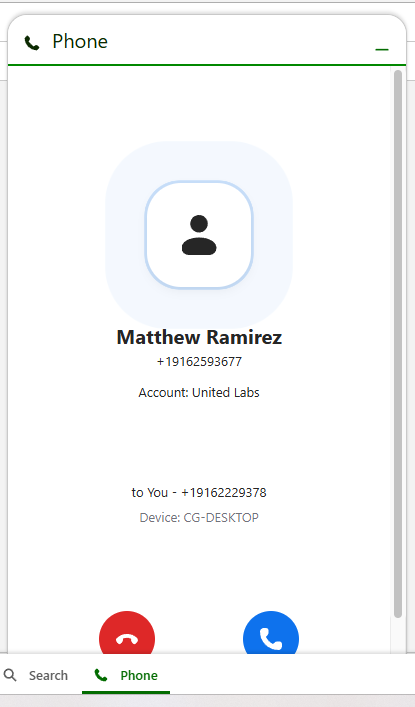
CTI (Computer Telephony Integration) is a common use case in Salesforce that uses caller ID to locate the right client and, ideally, present the correct record before an agent even clicks Answer.
When it works, it creates a seamless experience.
When it doesn’t, it creates frustration.
Why Screen Pops Fail
Several common scenarios can prevent screen pops from working properly:
- The phone number is stored in a custom field instead of a standard field
- The same number exists on multiple records, such as a Lead and Contact for the same person
- Phone number formats are inconsistent, including variations like +1, parentheses, or dashes
Any of these issues or many others can prevent Salesforce from finding a clear match, resulting in no screen pop or an incorrect one.
Using Pop to Flow as a Solution
In this case study, we will walk through how to use the Softphone Pop to Flow feature to handle these scenarios more reliably.
When no match is found, or when multiple matches exist, Salesforce launches a custom Screen Flow that we create.
Our example uses Zoom for Lightning (version 2.31) from Zoom Video Communications, but the same approach applies to any CTI adaptor that passes caller ID into Salesforce Flow.
This guide assumes your CTI adaptor is already installed and configured.
By routing screen pops through Flow, administrators gain full control over matching logic, duplicate handling, and user experience.
Creating a Screen Flow
Step 1: Create a New Screen Flow
Click Create
Navigate to Setup → Flows
Click New Flow
Select Screen Flow
Step 2: Create the Phone Input Variable
Click Open Toolbox (top-left) ![]()
Click New Resource
Configure:
- Resource Type: Variable
- API Name: Phone (this is the case sensitive variable used by Zoom Phone. Check with your CTI provider if “Pop to Flow” is supported and to see what variable name is used
- Data Type: Text
- Available for input: checked
- Available for output: unchecked
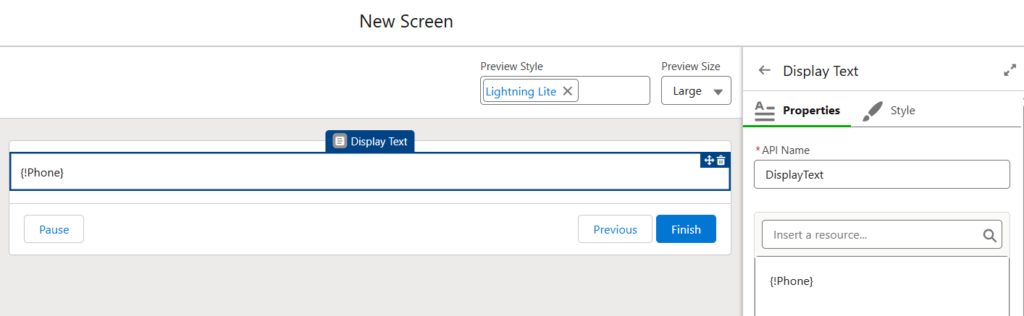
Step 3: Test the Incoming Phone Number
Before continuing, verify that the phone number is being passed correctly.
- Add a Screen element
- Add a Display Text component
- Reference
{!Phone}
Run the flow and place a test call to confirm the value is populated.
Step 4: Normalize the Phone Number
If formatting varies, normalize it before searching.
Create a formula resource:
Click New Resource
Configure:
- Resource Type: Formula
- API Name: formattedPhone
- Formula: RIGHT({!Phone}, 10)
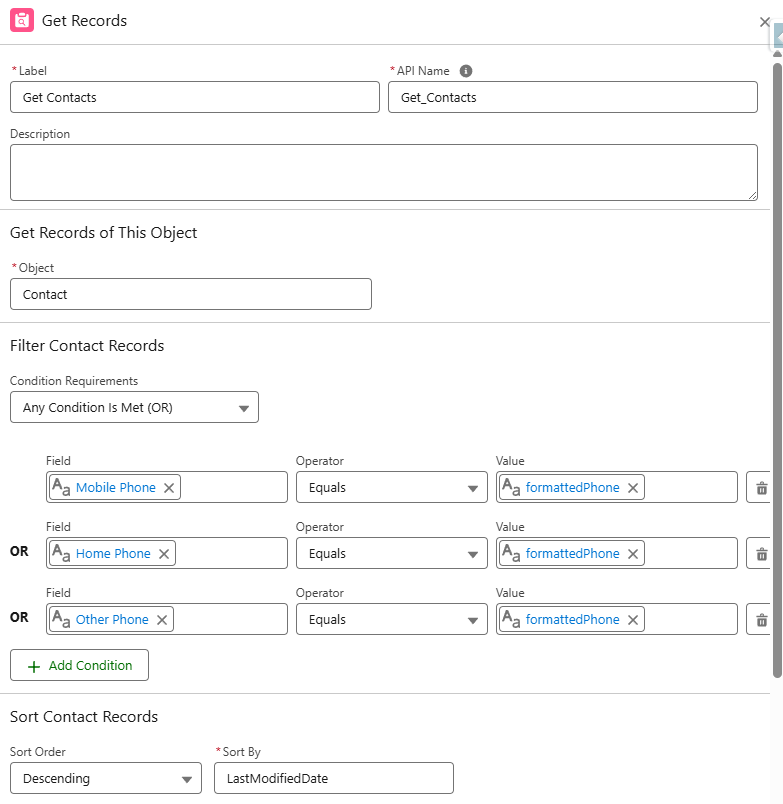
Step 5: Query Matching Records
Add a Get Records element.
Configuration
- Label: Get Contacts
- API Name: Get_Contacts
- Condition Requirements: Any Condition Is Met (OR)
Add conditions for each phone field you want to search:
Field: MobilePhone
Value: {!formattedPhone}
How Many Records to Store: All Records
Step 6: Display Results
Add a Screen element.
Configuration
Click Add Element → Screen
Label: Display Screen
API Name: Display_Screen
Add a Data Table component
Source Collection: Get_Contacts
Configure displayed columns
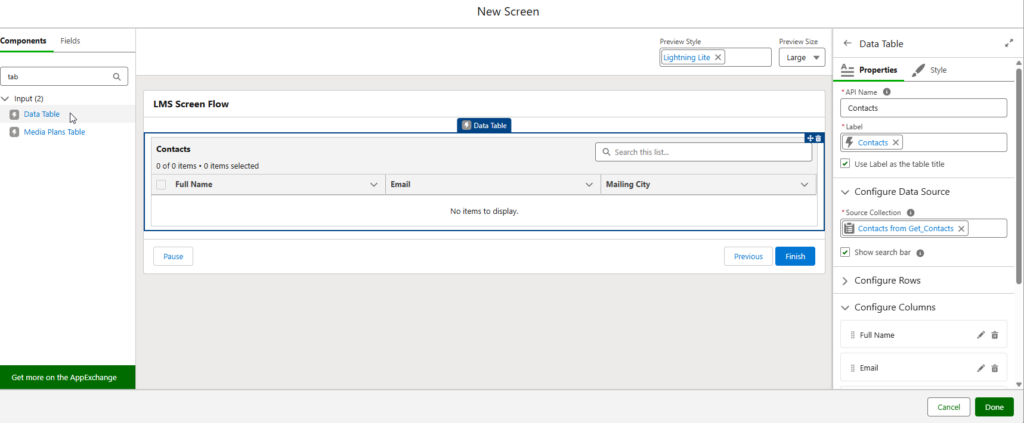
Click Done
Save and your Activate Flow
Step 7: Configure Softphone Layout
Navigate to Setup -> Softphone Layouts
If you see a page that says “Say Hello to Salesforce Call Center”
Click Continue
Click New to create a new Softphone Layout or click Edit to use an existing one.
Step 8: Configure Screen Pop Settings
Screen pop opens within: New browser window or tab
(This way you don’t loose what you’re working on when someone calls)
No matching records: Pop to flow and from the dropdown select the flow you created in the previous steps
Single-matching record: Pop detail page
If only 1 record is found, we want to simply open it
Multiple-matching records: This one can be handled 2 different ways depending on your use case
- Pop to search page – Opens search page with any matching records. For less complicated use cases, this is a great option.
- Pop to Flow – Opens in our flow where we can create custom logic to query and display those records to users
Click Save at the top of the page